Ben Fairbanks
Freelance Website Developer
Beginning Ruby and Intro to the Command Line
Welcome to the wonderful world of ruby and the Command Line Interface! This tutorial will help you to build a little knowledge of ruby basics and Command Line Interface usage through creating a program to store your random musings in a centralized .txt file.
We will be creating a simple Ruby program that will take your input in the Command Line Interface and stick it into a .text file. If none of that makes sense to you don't worry, it will by the end of the explanation. This tutorial is targeted towards those of you using a mac, so if you are not there may be some slight differences, file tree locations and input commands for instance.
The first thing you must understand is the command line interface. If you are using a mac your CLI will be called terminal, in Windows it will be called the command prompt, and if you are using Linux you should already know what I am talking about. The CLI is a way to input commands directly to your computer, and through these commands it functions as a textual interpretation of the file tree within your computer, as an alternative to the graphical user interface. Most people are more used to the GUI, but the CLI is a much, much more useful thing. The portion of this usefulness we are most interested in right now is the ability to create ruby files, mostly because we need a ruby file right about now. However, this ruby file needs to be in a specific spot, so that it can be accessed from any directory that your CLI might be when you want to access it. This spot on the file tree is /usr/local/bin, so conveniently you only need to type cd /usr/local/bin in your CLI. Go there. Go there now.
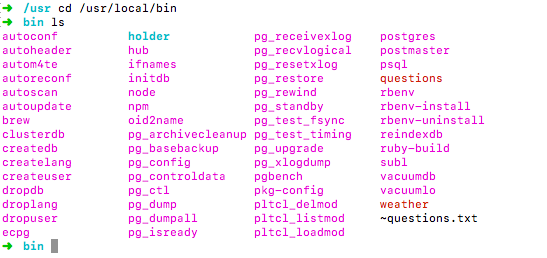
Now you hopefully have some sort of text editor downloaded. If not I suggest Sublime text, because it's what I know and it's what this next command line prompt uses, ignoring the many negative connotations associated with the band of the of the same name. Once you have Sublime text, type subl nameoffile.rb in your CLI.(replacing nameoffile with something you wish to type a hundred times in the near future).

Typing the last command should have opened up a new ruby file with the name you gave it in Sublime. Despite being in the right directory our program still is not accessible from all the other directories, and is still not accessible just by its name. To deal with the second problem first, type #!/usr/bin/env ruby at the very top of the file. This allows you to simply type the name of the file into the command line and have the ruby file execute. To rectify the first issue type chmod 755 whateveryounamedyourfile.rb in the CLI. This will change the permissions for the file and allow it to be called outside the directory in which it currently resides. Save your file so that all our hard work is not lost.

With that finished it is time to actually sit down and start writing your program! A good way to start is to sit down and map out what you want from your program. In this case we want a program that can be called from any directory through the CLI which opens up a specified .txt file and either records inputted data or displays the already recorded data. The first thing to do is to go to the directory you wish to store your .txt file in. My recommendation would be to use the ~(home) directory. Once you are in your chosen directory type pwd(print working directory) in your terminal. Copy the resulting location and paste it in your ruby file.

Now we want to be ablie to write things into our file from the terminal. To do this we need a process called ARGV. On the second line of your ruby file type direction *questionableinput = ARGV. Direction tells the program to check the first word in the input being brought in from the CLI, and respond accordingly. questionableinput is now shorthand for everything after direction that the command line brings into this program.
Now that input is a reality we need a way to open the text file we created earlier. We shall start this by creating an array and an integer at the top of this chunk of code, for reasons that will become clear later. The actual opening of the text file will be done with the File.readlines(file).each do |list| command, setting file equal to the location you copied two paragraphs earlier and the name of the text file. The storage << |list| portion of the program takes everything contained in the text file and stores it in the storage array.(the << is a method called piping which adds to whatever is one the right side of the pipes to the end of the array specified on the left of the pipes) This means that every time the program is opened the entire text file is stored within the program, ready to be manipulated. Pretty cool, eh?
The Add section will read as follows.
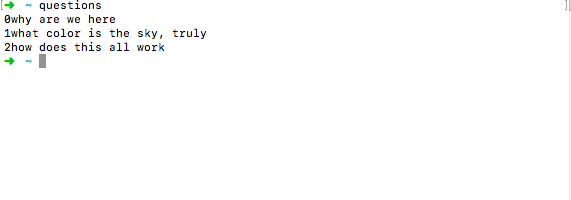
The add section is triggered by user input in the CLI. If direction, the first line of the CLI input is equal to add, the section between the red if and red elsif statements runs. These if, elsif, and else statements (located at the bottom) are called conditionals, and they make sense if you just speak them out loud. If this is true, the program does section a, else if that is true, the program does section b, else the program does section c. These statements are exclusionary, only one can run for each time the section is reached. In this case when the if statement is true, the contents of questionableinput are added to the storage array at it's last position, using the << method. This line of code also has the .join(" ") method attached. Why you ask? Well because when we ask a perfectly reasonable question like this:

It comes out of the argv looking like this:

This is because the ARGV, which we are using for our input sees each space as a start of a new object. Thus we get every word reproduced as a string containing only that word. While annoying, it is easily remedied using the the .join method. .Join smushes the various strings within the array together, with the space within quotations adding space in between each word. While this may seem like a less optimal form of output than if it just produced what we want, this targeting method is what allows us to set the first word as our add/remove keyword.
With the add section out of the way we can turn our attention to the rm or remove portion of the program.
If the direction portion of the input is equal to rm, than it takes the first word in questionable input, converts it to an integer, and slices out the string contained in the storage array at the corresponding location. Arrays order their items in a 0, 1, 2... fashion, so typing rm 0 will remove the first item on the list. The program then re-writes the modified list back to the file, overwriting what was there with the modified version. With this out of the way, we can now get to the display portion of the program.
This is what happens when the input contains anything other than rm or add as the first section of input. The entirety of the text file is already contained in the storage array, so we are able to call .each on string contained within the array. The {} is a way of encapsulating what should be done to each string and |note| is proxy for each individual string. The rest of this is very simple, the program puts the i variable (which begins at zero), and the first string in the array (which is the first line in the text file). The i variable is then ticked up by one, and the process is repeated for the second item in the array, and again for the next until all objects in the array are putsed with a number in front of them. The end at the finale of the program is necessary because the if/elsif/else conditional requires it.
And there you go! You should be able to type the name of your program from any directory to get a display of your recorded inputs. Happy recording!